Wednesday, December 30, 2009

Merry Christmas


I watched the old Norwegian film "Tante Pose" a couple of days ago. It's such a sweet film, showing a very cosy if somewhat dysfunctional Christmas celebration from the late 1800's. It's one of my favourite films, and I reckon I must have watched it some 20 to 30 times (I have it on DVD, and it's usually shown on TV during Christmas).

Tante Pose would translate to "Auntie Bag", a nickname earned by the old maiden aunt of the family's for her unfortunate habit of speaking her mind. I must admit I have always had a fond spot for Tante Pose, difficult as she might be.

Tante Pose decides to spend Christmas with her brother and his family, and arrives about an hour after her delayed letter informing of her arrival. The entire house is on edge, trying to prepare her bedchamber, manage the last bit of Christmas baking (a big thing in the olden days in Norway), and also quarrelling about who tells old Granddad (Granddad and Tante Pose cannot stand each other) about her arrival.

I will not divulge too much of how the story goes, in case someone out there hasn't seen the film, and would like to, but suffice it to say that Granddad does a great job of teasing Tante Pose, she has her sweet revenge, and also manages to create more than one scandal before the Christmas stay is over.


Merry Christmas, everyone :o)

Wednesday, October 14, 2009

Reusing Vintage Lipstick Cases

I own a few vintage lipstick cases, and I have for the longest time wanted to find a way to use them. Needless to say, you cannot just go to the store and get lipstick refills for them. Nevertheless I decided to go to one of the local beauty stores and ask if any of them had any ideas, and as it turns out, one of the ladies there had tried refilling lipstick cases herself.

This is how it's done.

There are two types of vintage lipstick cases. One type is essentially empty when you buy it, and you get the lipstick refill tube separately. If you have one of the empty lipstick cases you have to get hold of an old refill, remove the lipstick from it, and clean it thoroughly. If you have one of the normal lipstick cases, remove the old lipstick and clean it thoroughly. The lipstick case in the picture is the latter type. I prefer these, as they are easier to clean. You can actually dismantle it by pulling off the tube, clean it, and put it together again. You can see the different parts below.


Once this has been done you can go ahead and decide which replacement lipstick you want. I would recommend you to take a gauge measure of some kind to try and determine the size of the lipstick replacement. So far (I've only done two lipsticks so far) the sizes seem fairly standardized.

The lipstick needs to be firm, and it's probably easier to do this with a new lipstick than an old one.

Once you have decided on a lipstick, put in the freezer for a few hours. I left it for two hours. Then take a piece of tissue and use it to get a grip on the lipstick. Pull the lipstick gently out, insert it into the vintage lipstick case, and voilà, you are ready to dazzle your friends with your elegant, vintage lipstick :o)

Tuesday, October 06, 2009

Winter Already!


As I mentioned in yesterdays post, it was snowing quite a few places on the journey back from the north of Norway a few days ago, but as Lillehammer is in the south of the country, I wasn't expecting it to start snowing here today.

Stating that I was more or less prepared for winter was apparently not a good move.

The picture above is showing the view from my kitchen window. It really doesn't do the weather justice, the snow flakes are huge, and it is coming down pretty hard. I am not sure at what time it started, but I would assume that it was no more than an hour before I took the picture.

I left work early today, which in a sense was a stroke of luck (even if the stomach upset that led to the hasty departure was anything but pleasant), since I was wearing mary-janes to work.

I do feel a little bemused about this. When we were living in Ireland, snow was rare, and mostly a source of entertainment, as the traffic would grind to a halt, trains stop running, and people were generally be quite taken by surprise by snow. It would also usually never last more than a few hours. Now this - this is a prelude to what could possibly be 6 months of snow.

It could very well be that I'm not quite ready for winter yet...

Monday, October 05, 2009

Autumn Break


I offered myself the luxury of an autumn break this year, and spent a week at my mum's place in the north of Norway.

I intended to take pictures, but as the rain was literally pouring down most of the week, I didn't get around to it, so I have instead posted a picture taken some three years ago, when I was home for Christmas.

Imagine it without snow, with green, golden and red leaves, and sopping wet from rain, and there you have it - Korgen at autumn.

I had a lovely time, catching up with family and friends, some of which I hadn't seen in 3 years, and I also got to look through my mums box of old buttons, something I loved to do when I was growing up. It was just as exciting this time around as when I was 10 :o)

Talking about snow; it's still only October, but when I took the train home from holidays, it was actually snowing several places. I must admit it feels odd, after so many years spent in a place where snow is a rarity, to have start snowing in October. But on the other hand, I have lots of candles, I have stacked up on tea and books, and I reckon I'm ready for winter, although I would prefer it to wait at least a month longer.

Wednesday, September 23, 2009

More Aprons


Plaid apron front view
Originally uploaded by Vintage Granny

This is another apron I made using a 1940's pattern, from the booklet "Ten All American Novel Aprons". It came together very nicely, and I decided to use buttons for the back/shoulder straps, as I couldn't figure out how to get into the apron if I did what the pattern called for, and stitched the shoulder straps to the waistband.

I was planning on making appliqués for the bib; it's supposed to have an apple appliqué, but I couldn't decide on which fabric to use, so I never got around to it.

I think it looks good without the appliqué as well, so I might decide to keep it like this. What does my readers think? Apple appliqué or not?

Sunday, September 20, 2009

Huzza!

I keep saying I will never again take on a new commission, but I made an exception for my future sister in law, and agreed to make her wedding gown, which is now finished, approved, and also, gladly, loved :o)

Stine picked up the finished dress today, and also tried it on with the most important accessories. There's no denying it, it looked lovely on her.

The dress is in a 1930's design, made of white crepe back satin, with a fitted high waisted, pleated bodice, and a bias cut skirt. It has a princess neckline, and a deep V cut back. I will not be able to post any pictures until after the wedding, but I cannot wait to see her all made up in a 1930's hair style, make-up, and wearing period accessories.

Wednesday, September 02, 2009

Thrift Store Find :o)

During my search for the perfect winter bloomers (say one thing for Suna, say she's persistent), I have given some thought to perhaps knitting a pair. But as yarn is expensive, the knitting pattern I have is from I think 1905, and it's hard to substitute the yarn called for, as well as tricky to estimate which needle size I'll need, I have been reluctant to give it a try.

Last weekend I visited my favourite thrift store, and one of the first things I saw what the wonderful knitted bloomers above :oD

Such luck, I could hardly believe my eyes! They are 100% wool, very soft to the touch, and they fit perfectly :oD

Of course I got them, and I'm really looking forward to wearing them this winter. I thought last winter was bad, but now I've been told it was rather mild (with -25 degrees!). Apparently, it's not unusual to get up to -32. If this proves true, I'll probably need knitted long johns...

Saturday, August 29, 2009

Black Flannel Bloomers

The "Bloomers for Winter"-project is still running, and I have just completed my second pair of bloomers. These are made of black flannel (I dyed an old bed sheet for the purpose), with lace accents, and satin bows. I used my favourite pair of pyjama bottoms as pattern, or rather, I used them to make the pattern.

The bloomers turned out quite nice, I think. They are certainly very comfortable, and should keep me warm in winter :o)

Friday, August 28, 2009

New Apron

I have this fascination with aprons, this I freely admit. I love them. I enjoy both using them while cooking, and simply looking at them. It's a very feminine garment, and I love the frillyness and the retro appeal of them. At the moment I own 5 aprons, including this. This one will however be a birthday gift, so it won't remain in my collection for long.

Last week the Commercial Pattern Archive had a free, week long trial, and this is where I found the pattern I used for this apron. The pattern was from the 1930's, and has a flattering bias cut. The checked fabric I got at my favourite thrift store for a pittance, I don't think it's vintage, but it still has a vintage look, which is good enough for me. Here's a view of the back:


I'm rather proud of this apron; it's simple, yet very charming, and I hope the recipient will be as happy with it as I am :o)

Monday, August 24, 2009

New Laptop


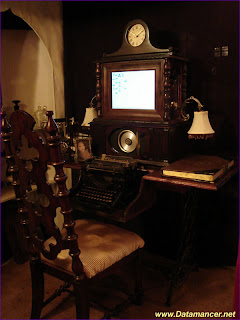
After discovering the Dream Office, I did some more browsing, and happened upon this; a marvellously steampunk laptop. Just look at the details, the brass accents, and the aged wooden panel. I am literally drooling here.

Considering that the creator of this beauty charges 1200 - 1500 USD for one of his custom keyboards, I assume I would have to win the lottery to ever be able to afford this beauty, but I can still dream :o)

If you like the look of this, you can visit the makers homepage here. Looking at his creations makes me regret I didn't pay more attention in the woodwork classes we had at school, but at the time, I didn't see any apparent use for the lessons, except for making cradles for dolls, collages with shaved wood and brass, and the like. Looking back at those lessons, I get a feeling that most of the time was spent burning letters into bits of wood. God knows where all the odd little things I made ended up. But if I had known that some day, I might be able to make something like this, that would have changed the level of commitment completely, I think.


I wonder if I would be able to find classes for this type of work where I live. I think I'll have to check up on that :o)

Sunday, August 23, 2009

Dream Office


My good friend Marcus found this picture online today, showed it to me, and I just love it.

Can you imagine this as your home office? I know I can! I would love sitting at the desk, imagining I'm in a steampunk movie, perhaps "The Golden Compass".

Sigh :o)

Wednesday, August 19, 2009

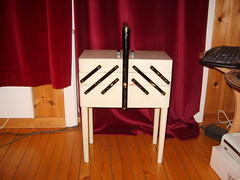
1920's sewing chest


1920's sewing chest
Originally uploaded by Vintage Granny

When I visited my aunts in Oslo this spring I went to this huge flea market with auntie Ann (owner of the vintage store Gatsby). We were waiting outside the market for about 30 minutes before they opened, to make sure we'd be amongst the first people in. It was a strange experience, my aunt has been in this business for some 25 - 30 years, and she knows all the others in the business, and it seemed all the "oldies" were gathered there that morning, discussing how the flea markets were better in the olden days, and how all these young upstarts were invading their territories - it was an education in itself. Especially since these guys tried to wrest information from each other regarding where they find all their merchandise, while jealously refusing to give out information regarding their own business dealings.

Once the market opened, everyone run like they had the devil on their heels, and I must admit I kept to the edge of the crowd, as I was scared of getting run over. Some of these people were fierce...

I had my eye on this chest when I was waiting outside the market, but didn't have much hope of getting to it first, but luckily, it was completely neglected by the running crowd, and I got if for a pitteance :o)

My aunt had given me strict instructions to haggle for anything I wanted, and I did. I am very proud of that, actually. I usually never have the guts to haggle, but driven on by the scenes around me I found myself replying "how about 30" when the seller asked for 50 NOK. After some symbolic squealing he agreed to 35. In the end I got it for 28, as this was all the change I had, and this guy couldn't give change for the 200 NOK bill I presented him with :o)

This was in truth a very, very good day. I also got a tweed suit for 50 NOK (haggled down from 60).

Monday, August 03, 2009

Behold the baggy bloomers of winter :o)


bloomers side
Originally uploaded by Vintage Granny

As promised in the previous post, here's a picture of the bloomers I made last weekend. If you want to see more pictures of them you can click on the picture, and visit my Flickr account.

Once the frills were in place, the bloomers looked a lot better, I find. I will still dye them, and probably also attach some lace to the frills, but now I can actually see myself wearing the bloomers, baggy behind or not :o)

Sunday, August 02, 2009

Flannel bloomers for the winter


Lillehammer gets very, very cold in winter, last winter we had -20 and more. Freezing! So with August already here, I started thinking about how to keep warm in skirts next winter, and I decided to make bloomers. Flannel bloomers.

I decided to use the above pattern, which I got from one of my pattern books. I scaled it as per the instructions, it came together really well, and have all the distinguising marks of victorian bloomers, including a baggy, enormous bum. I have no doubt these bloomers will keep me warm, considering the amount of fabric used, but these bloomers might be the one of the least sexy garments I have ever seen. I suppose it doesn't help that I made them from a yellow, pink and baby blue flannel sheet. I am planning to dye them navy blue though, hopefully that will help. I will post a picture of the bloomers as they are now later on, as I reckon there are others out there besides my boyfriend in need of a good laugh ;o)

Thursday, July 30, 2009

needle case and stitch markers


needle case and stitch markers
Originally uploaded by Vintage Granny

Nope, I'm not dead ;o)

I have had a period of not feeling too well, and blogging just didn't make it on the list of priorities. After seeing a specialist today, I have an inkling of what's wrong, and it seems this in itself gave me a burst of energy :o)

The needle case in the picture was made by yours truly after discovering that I actually have 3 sets of dpn's in size 3.5 mm. I realized that the old system just didn't cut it, and decided to make a case just for dpn's. This way at least I have a chance of keeping track of what I have, size wise. The downside is that there's not much room for more needles, if I should need other sizes, but if that should happen, I'll deal with it then.

Tuesday, June 09, 2009

Tailored Garments


Tailored Garments
Originally uploaded by Vintage Granny

This little book is a treasure, and worth every penny I gave for it. It gives detailed, step by step instructions on tailoring, with emphasis on the tailored skirt suit. It was published in the 1920's I think.

The first time I tried my hand at tailoring was some 4 years ago, when I made a coach man's coat for my boyfriend, and I used a book called Couture Sewing Techniques, by Claire Shaeffer as guide. The Couture book was not bad, but this little gem outshines it. It has detailed drawings of each step, as well as very straight forward explanations. If any of you guys out there wants to make your own tailored jacket or coat, I recommend you to get hold of this book :o)

Wednesday, June 03, 2009

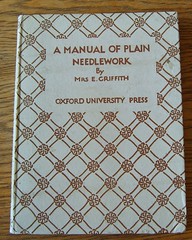
A Manual of Plain Needlework


plain needlework
Originally uploaded by Vintage Granny

I got this book off ebay a while back because I wanted a book on hand stitching techniques. I had never heard of the book, but the price was agreeable, and it wouldn't be a huge loss if the book turned out a disappointment.

The book is actually quite handy. It covers most of the things which may and often do cause headache when finishing garments, such as finishing seams, edges and openings. There's not much in here that's really new, but having it all in one volume is great. I do have other books with sections on hand stitching, but they are big and bulky compared to this slim volume.

If you click on the picture, you will be taken to my flickr account, which holds a few more pictures of the book.

Thursday, May 21, 2009

Domestic Goddess


No one would ever call me a domestic goddess, I think. There's just too much constant mess in our home, and dust bunnies multiplying in corners and under couches. The recent good weather also tells me that the windows need to be cleaned. Sigh... I don't even dare think about how the apartment would look if it hadn't been for the fact that we ever so often have people visiting in weekends, and this forces us to clean.

So, no domestic goddess in the house cleaning department, but I do enjoy cooking, and I just have to share a link with you guys. BBC food has lots and lots of recipes, and also a decent section on indian food. I love indian, but having moved to rural Norway, indian take-out hasn't been an option, so I've had to try to figure out how to make my favourite dishes myself. Today I made chicken bhuna, and peshwari nans, the nan's courtesy of BBC Food, and it was just lovely. I found the recipe for the chichen bhuna on this jar. I tried to do a search for the recipe on their website, but it seems they didn't list it.

If you want to try it, here's how you make it:

Ingredients:
I onion finely chopped
approx 400 grammes of chicken, diced
1/2 jar of Bhuna Curry Paste
I box of canned tomatoes
2 teaspoons of tomato puré
approx 200 ml water

Fry the onions in a little oil until tender, mix in the bhuna curry paste, and add the chicken. Fry the chicken until sealed. Then add the rest, and let the dish simmer for 20 minutes. Serve with rice and nan.

Wednesday, May 20, 2009

Ha-ha!

As it turns out, it was possible to adjust the binder. There was a tiny screw holding it in position, and when I loosened it, I could move the binding attachment a bit to the left :o)


The Bias Binder take 2

A few days ago I had another go with the bias binder, with proper bias binding this time, and got the same result as last time. It seems that the binder attachment isn't properly aligned with the needle. This is very annoying, and I'll examine the binder closer, to see if I can perhaps move the binder slightly to the left. I also wonder if the attachment would be easier to use with a hand crank machine. When I use the binder on my 1960's singer, the binding seems to just miss the feed-dogs, and because of this, the fabric isn't properly fed. I am considering bringing the hand crank from 1908 down from the attic, and experiment a little. But not until I have finished the wedding dress I ought to be working on.

Wednesday, May 13, 2009

Competition

I browsed through some of the blogs I try to keep up with after work, and found that one of the bloggers, Bronny is offering up this completely yummy and very fitting embroidery, with the text "She who dies with the most patterns, is not stitching fast enough". Very fitting, as I feel a blush coming up just thinking of my stash of patterns. It's quickly approaching an embarrassing level, and if someone asks how many sewing patterns I own, I'm apt to lie. Not necessarily a direct lie though, but something along the lines of - oh, I don't know, perhaps 20. I haven't counted. I have of course not counted, but as one of my favourite books contain no less than 350 sewing, needlework and millinery patterns, it doesn't take a math genius to spot the fib.

I do intend to make most of the patterns though - eventually ;o)

Sunday, May 10, 2009

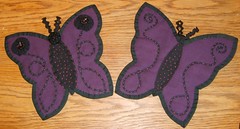
Butterfly potholders


Butterfly potholders
Originally uploaded by Vintage Granny

Behold my latest creation.

I found some old potholder patterns online a while back, at tipnut.com. I had trouble deciding which ones to make first, but finally decided to make the butterfly potholders.

I used thick wool coating for wadding, just one layer this time. I haven't tested if that's sufficient, but if it turns out that it's not, I really don't mind keeping them just for decoration, as I already have the heart shaped potholders for everyday use.

Friday, May 08, 2009

Sad news

Even if I have moved back to Norway, I still keep in touch with my old colleagues and friends in Ireland, and these last few days, friends from my former work place have been relating bad news. 

The finance crisis has been hard on advertising companies in general, and my old company has suffered badly, although whether this is mainly due to the crisis, business decisions or management is, I would assume, an open question.

No matter the reason, the result is still that another 9 people have been laid off. I am not sure of the details, but I have the impression that they had to leave the very day they were told. Also the way they were told leave a thing or two to be desired. After having worked in a company for several years, having done a good job, and done your best for the company, I would say that you deserve more than having one of the managers come up to you, at work, in public, to let you know, quite casually, that you have been fired.

Monday, May 04, 2009

Vintage Sewing Books

I have been scouring the net trying to get hold of useful sewing books, and found many books listed on Amazon and Abe Books for instance, but unfortunately, there seems to be a general lack of information regarding the books themselves, such as table of contents, excerpts from the books, and other useful tidbits of information.

I have therefore taken pictures of some of my books, which I will post one book at a time, along with a review. Hopefully the reviews and pictures will be useful for others out there.

Monday, April 13, 2009

The Bias Binder

I am currently working on a 1950's net petticoat, which will be a present for my cousin, and this project allowed me to test the bias binder earlier today.

It looks to me that the 201 sewing machine, which these attachments were intended for, had the needle positioned a tiny bit further to the right than mine, and today I noticed that this makes the bias binder difficult to use. The binder worked wonderfully in so far as it does what it's supposed to - folds and keeps the binding in place while you are stitching, but unfortunately half of the time, the stitches didn't quite catch the binding.

I am wondering if this is solely due to the positioning of the needle, or if it can also be blamed on the binding. I used some cheap polyester ribbon I got in Inspiring Ideas, Blanchardstown, when I was living in Ireland. It looks quite OK, but it is very stiff, thick and slippery. I also think it would have been easier to stitch it on if I had been attaching it to something other than net. Very flimsy stuff, net.

Sunday, April 12, 2009

Sewing Machine Attachments


Singer attachments (mostly)
Originally uploaded by Vintage Granny

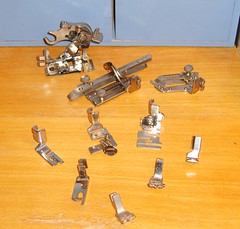
Here's a picture of the attachments I got from ebay, as well as a few I got from one of the local thrift stores.

Starting at the back row, the attachment on the left back row is a ruffler. Amazing thing, I tested it already, and it makes wonderful ruffles and pleats. The next attachment is a tuck marker. It makes it easy to sew even tucks. I haven't tested it yet, but from what I've read, it's very handy. The last attachment on the back row is an adjustable hemmer.

The attachment at the left in the middle row is a foot hemmer, which creates very narrow hems, and according the only person I know who have used it, it works well for very fine fabrics. The next attachment is a bias binder, then there is the edge stitcher, which is good for piecing strips of lace together. The last attachment in the middle row is a gatherer, which works well on fine fabrics.

The 3 attachments in the front I got from a local thrift store. I can use it with the singer, although I suspect they were made for a Huskvarna machine. I am not 100% sure what these attachments do, but I suspect that the one on the left is for sewing on braids. The other two are very much alike, in fact, the only difference I can see is that one of them have a graduated groove underneath it.

Tuesday, April 07, 2009

black/red 1950's style petticoat


black/red 1950's style petticoat
Originally uploaded by Vintage Granny

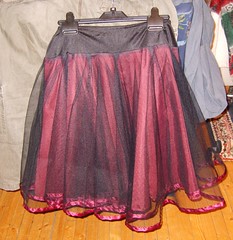
Some 2 years ago I made 2 1950 style petticoats out of stiff net. They turned out great, and due to heavy use one of them has several tears in it, and both of them became very limp. I mended most of the tears a while back, and yesterday I decided to buy a can of starch and see if I could pouf them up a bit. I drenched them in smelly starch, let them dry, and repeated the treatment some 4 times, and it worked quite well. They could do with a few more treatments, but the smell of the starch got to me in the end.

Saturday, April 04, 2009

Vintage dress recovery 2

Yay! The dress is saved, I think. It still needs a light steaming to ease out the crinkles left by the stretching process, but other than that, I think the dress will be OK :o)

I think I have finally learned not to throw vintage dresses in the washer ;o)

Sunday, March 29, 2009

Vintage dress recovery

It seems the vintage dress can be saved after all. The steps I took yesterday was successful, but the dress was still a little short today, in the back, so I re-pinned it, moistened it, and left it on the ironing board. I will check it again tomorrow, and if the body of the dress seems fine then, I will attend to the sleeves.

Saturday, March 28, 2009

Oh dear...

Why is it that one repeats the same mistakes, with equally disastrous results? Shouldn't a bell go off somewhere, alerting you to the fact that this will not end well?

What did I do? I got a pretty late 1950's crepe dress from my aunt, which I was considering wearing tonight. Upon inspection I noticed a largish stain on the front of the dress, and in stead of pausing to consider the condition of the last vintage dress I tossed in the machine (which shrunk considerably, and  lost its shape), I decided that it probably would be fine if I washed the dress on a 30 degree silk program.

The dress came out of the washer some 2 - 3 inches shorter that it was before washing...

I have now pinned it into shape on an ironing board, steamed it very lightly, and I am just hoping the damage will be undone this way. 

Friday, March 27, 2009

Thursday, March 26, 2009

Singer attachments

I got this really marvelous Singer sewing machine as a gift from my mum in law; it's a low shank Singer, and as strong as they get. It will chew through several layers of denim without any sign of hesitation, stop, or painful sounds, all of which I was used to from my new Singer, which looked good, but was quite frankly not that great.

I have been browsing e-bay for a ruffler, and finally found a lot of attachments for singer low shank, and I thought, heck, I'll make a bid for it, even if I don't know how to use most of them. The seller listed the items in the lot, and driven by curiosity I did a search for some of the names, and I found this site, which lists every conceivable attachment for the Singer feather weight, which is also a low shank machine. This list is really great, as there are detailed instructions on how to use these mysterious looking attachments. Turns out I made a bargain :oD

Tuesday, March 24, 2009

Layout changes

Having received merciless feedback from Marcus, I have now changed the background for my blog. 

Any thoughts, musings or opinion on the blog layout, how fast the blog is loading, user friendliness etc?

Monday, March 23, 2009

testing, testing...

I have decided to move my blog from blogdrive to blogspot, as it's easier to manage with blogspot, and hopefully I can post more pictures to the blog without running out of space.

Now I need feedback. Do you guys like the new layout?

For comparison please visit the original blog, and let me know what you think.